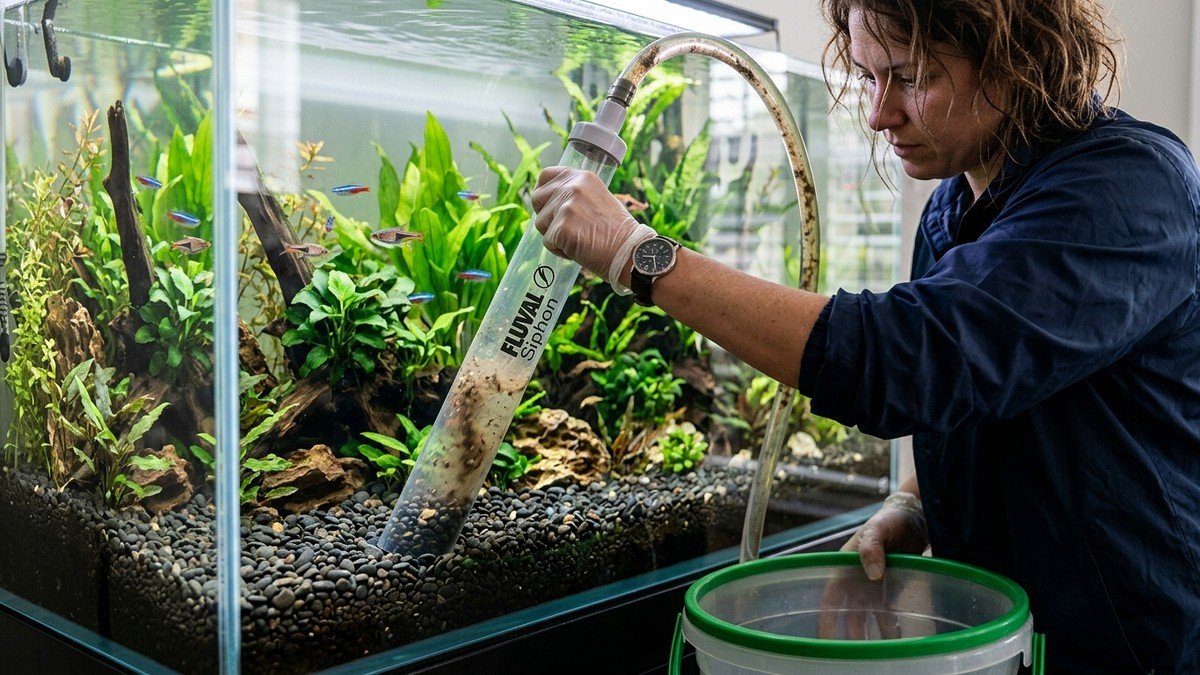
Over days and weeks, fish waste, unconsumed food particles, dead plant fragments, and decaying biofilm settle quietly into the bottom substrate of your aquarium. To the casual eye, the water above may look sparkling clear, but beneath the surface layer of pebbles lies an accumulating pocket of organic detritus. Knowing how to clean fish tank gravel efficiently using a siphon vacuum preserves crystal-clear water, removes toxin reservoirs, and safeguards your biological ecosystem without disrupting your fish.
Essential Substrate Safety Rule
Never remove all gravel from your tank to wash it in the sink. Your substrate is a living biological bio-filter home to millions of beneficial nitrifying bacteria. Cleaning gravel with chlorinated tap water will sterilize these bacteria, precipitating a lethal tank crash.
1. Equipment Needed for Gravel Cleaning
Gather these straightforward tools before starting your maintenance routine:
- Aquarium Siphon Gravel Vacuum: A wide plastic cylinder attached to six feet of flexible vinyl tubing. For larger tanks, systems like the Python No Spill Clean and Fill connect directly to your household faucet.
- Dedicated Clean 5-Gallon Bucket: Use a bucket reserved strictly for aquarium maintenance, completely free of household chemical residues or detergents.
- Dechlorinator and Water Conditioner: High-grade water conditioner to treat fresh tap water before refilling the tank.
- Aquarium Algae Scraper: To wipe inside glass panes prior to vacuuming so dislodged algae settles into the substrate and gets sucked out.
Substrate Cleaning Frequency and Technique Matrix
Match your cleaning depth to your specific tank substrate and setup type:
| Aquarium Setup | Substrate Type | Vacuuming Technique | Recommended Frequency |
|---|---|---|---|
| Standard Community Tank | Standard 3-5mm gravel | Deep plunge down to bottom glass | Every 7 to 14 days |
| Planted Dirted Aquarium | Aqua-soil or capped dirt | Hover 1 inch above surface only | Every 14 to 21 days |
| Fine Sand Bed Tank | Fine silica or pool filter sand | Circular swirling motion above sand | Weekly light surface siphon |
| Heavy Bio-load (Cichlids/Goldfish) | Coarse river rock or pebble | Thorough multi-point deep suction | Weekly 25 to 30% water change |
2. Step-by-Step Gravel Cleaning Tutorial
Follow these sequential steps to clean gravel efficiently while maintaining parameter stability:
Step 1: Disconnect Heaters and Internal Powerheads
Unplug your aquarium heater and power filters before lowering water levels. Submersible glass heaters left exposed to air will crack from thermal stress, while running filter pumps dry damages internal impellers.
Step 2: Initiate Gravity Siphon and Plunge Vacuum
Place the bucket lower than the aquarium to establish gravity flow. Start water flow using a siphon bulb or water submersion. Push the rigid vacuum cylinder straight down into the gravel until it touches the bottom glass plate.
Step 3: Tumble Gravel and Control Flow
Watch the pebbles churn inside the wide cylinder. Because pebbles are heavy, they tumble in place, while lightweight brown detritus and fish waste are swept up into the siphon tube. If gravel rises toward the top of the tube, briefly kink the hose with your finger to let the stones fall back down.
Step 4: Follow the One-Third Rotation Rule
Never deep-clean 100 percent of your substrate in one sitting. Divide your aquarium floor into three imaginary zones. Vacuum Zone A this week, Zone B next week, and Zone C the following week. This rotation preserves uninterrupted bacterial nitrifying capacity.
Complete Aquarium Husbandry Library
Master every aspect of aquarium care with our foundational maintenance guides:
5. The Substrate Bio-Filter: Why Bleaching Gravel Is Fatal
Beginner aquarists often ask why they cannot simply remove all gravel, wash it in bleach or scalding hot water, and return it to the tank. Doing so is one of the most fatal mistakes in fish keeping:
- Surface Area for Beneficial Bacteria: While filter media houses significant biological bacteria, the porous surface area of gravel stones across the entire tank floor contains up to 40 percent of your aquarium’s nitrifying bio-colony.
- Sterilization Crashes the Nitrogen Cycle: Washing gravel in chlorinated tap water or hot water instantly kills these autotrophic bacteria. The moment the fish are returned, uneaten waste goes unprocessed, triggering immediate lethal ammonia spikes.
- Chemical Residue Toxicity: Porous gravel absorbs bleach and dish soap detergents, slowly leaching deadly chemical toxins back into the water column for weeks.
6. Sand Substrate Maintenance and Avoiding Gas Pockets
Cleaning a fine sand bed requires fundamentally different physics than cleaning coarse aquarium gravel. Because fine sand grains are lightweight, pushing a vacuum into the bed sucks sand into your bucket:
- The Circular Swirl Hover Technique: Hover the vacuum cylinder one inch above the sand surface and swirl it in gentle circles. This generates a miniature vortex that lifts lightweight fish feces and detritus into the siphon while allowing the heavier sand grains to settle back down.
- Aerating Sand with a Chopstick: Because fine sand compacts tightly, anaerobic hypoxic layers can develop beneath the surface. Before siphoning, gently stir the sand bed with a wooden chopstick once a month to release small gas pockets before they turn into toxic hydrogen sulfide.
- Malaysian Trumpet Snails (MTS): Introducing live Malaysian Trumpet Snails provides continuous biological aeration. These nocturnal burrowing snails churn through sand constantly, preventing compaction naturally.
7. Siphoning Heavily Planted Tanks Without Damaging Roots
In planted aquariums with rooted carpeting plants (Dwarf Baby Tears, Monte Carlo) or heavy root-feeders (Amazon Swords, Cryptocorynes), deep gravel vacuuming causes catastrophic root trauma:
Deep plunging unseats delicate plant roots, exposes nutrient-rich aqua-soil layers to the water column (triggering massive hair algae outbreaks), and siphons away beneficial root fertilizer tabs. In planted tanks, restrict gravel vacuuming strictly to open swimming lanes and unplanted feeding zones, lightly gliding the siphon over plant carpets without plunging into the root substrate.
8. Replacement Water Chemistry and Temperature Matching
Completing a gravel vacuuming session requires refilling the tank with clean replacement water. Follow these strict water quality benchmarks:
- Match Temperature Within 1.5 Degrees F: Pouring cold tap water into a warm tropical tank shocks fish immune systems, triggering immediate outbreaks of dormant ich parasites. Use a digital thermometer to calibrate faucet water temperature before refilling.
- Neutralize Chlorine and Chloramines: Modern municipal water utilities treat tap water with chloramines (chlorine bonded with ammonia). Standard cheap dechlorinators only break the chlorine bond, leaving toxic free ammonia in the water. Use advanced water conditioners (Seachem Prime) that neutralize both chlorine and heavy metals.
- Slow Pour Direction: Pour replacement water gently over an upturned dinner plate or against your hand to diffuse water velocity, preventing the incoming stream from digging up cleaned substrate.
Frequently Asked Questions (FAQs)
1. Should I remove my fish when vacuuming the gravel?
No, never remove your fish from the tank to clean gravel. Catching and relocating fish causes extreme stress, damages protective slime coats, and disrupts water chemistry stability.
2. How often should you vacuum aquarium gravel?
Most planted and community freshwater aquariums benefit from a gravel vacuuming session every one to two weeks, performed simultaneously with your routine 15 to 25 percent partial water change.
3. Can cleaning gravel destroy beneficial bacteria?
Vacuuming too aggressively or rinsing all gravel in untreated tap water will destroy beneficial nitrifying colonies. Only vacuum one-third to one-half of the substrate bed during any single maintenance session.
4. How do you start an aquarium siphon gravel vacuum without using your mouth?
Submerge the vacuum cylinder completely underwater until full, lift it briefly until water enters the tubing, and plunge it back down. Alternatively, utilize an inexpensive hand-squeeze primer bulb or tap-attached water changer.
5. How do you clean gravel in a heavily planted aquarium?
In planted tanks with root-feeding plants, hover the vacuum siphon one inch above the substrate surface to lift loose organic detritus without disturbing delicate root structures and nutrient-rich base substrate.
6. What should you do if gravel gets sucked too far up the siphon tube?
Simply kink or crimp the flexible vinyl tubing with your hand for two seconds. Halting the water suction immediately allows the heavier pebbles to tumble safely back down to the substrate bed.
Why is aquarium water cloudy right after vacuuming the gravel?
Siphoning gravel stirs up microscopic dust particles and harmless detritus into the water column. This mechanical haze normally clears within 2 to 4 hours as mechanical filter floss traps the particles.
Can you use a gravel vacuum in an aquarium with tiny baby fry or shrimp?
Yes, but slip a clean piece of mesh nylon stocking or clean pantyhose over the vacuum intake cylinder secured with a rubber band. Suction pulls dirty water through the mesh while preventing tiny fry or shrimp from being siphoned.